Older deck boards make stain selection more complicated. Transparent stain keeps the wood’s appearance central, while solid-color stain shifts attention toward a more uniform color. The right choice depends on the actual boards, their existing finish, and the result you want.
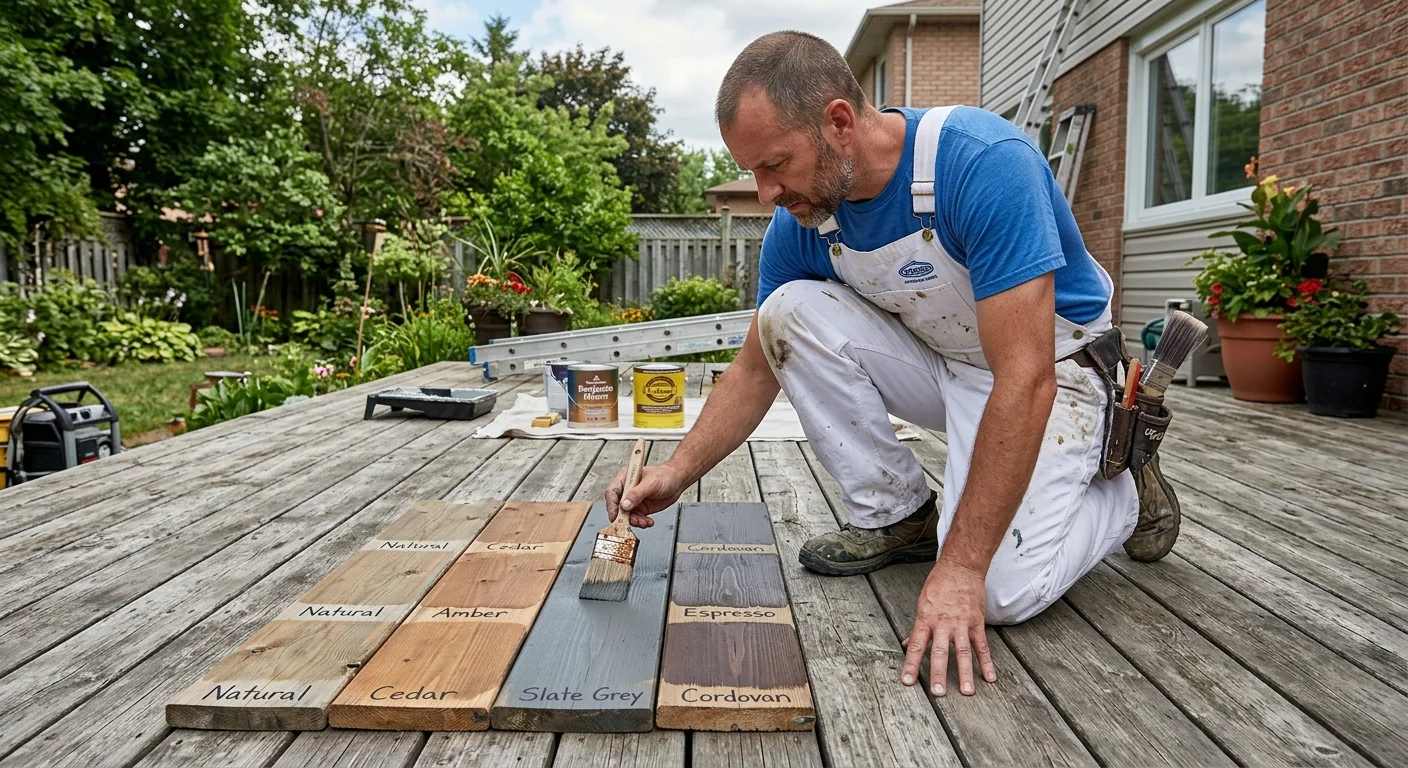
Identify the wood and existing finish
Start with the deck that’s in front of you. Don’t choose from a sample card before identifying the boards and their current coating.
Ask the painter to inspect several areas, not one convenient corner. Walking surfaces, railings, stair treads, and shaded sections may present different conditions. Mark boards with cracks, soft areas, raised fasteners, splinters, or previous repairs. Those items belong in the repair discussion, separate from the stain-color decision.
Next, identify what’s already on the wood. The existing layer might be a transparent stain, a tinted finish, a solid-color coating, or an unknown product. Old invoices and leftover cans can help. A readable label may provide the exact product name, color, and application instructions.
If the old product can’t be identified, say that plainly. Don’t let anyone guess at compatibility from color alone. Ask the quoting painter how they’ll confirm whether the proposed system can go over the remaining finish. The product manufacturer’s current instructions should guide that decision.
Also decide which parts of the wood’s appearance you want to retain. Some homeowners like visible grain, knots, and natural color variation. Others want the deck to read as one consistent color beside the house.
This first inspection narrows the choice. It also keeps stain from becoming a substitute for repairs. A proposal should separate board replacement, fastening, surface preparation, and coating application. Our fence and deck staining service can connect you with licensed independent painters who assess that scope.
Check whether the deck can accept another stain
A weathered appearance doesn’t reveal whether the surface is ready for another coating. The painter needs to evaluate the remaining finish and prepare a representative test area.
Ask what will be removed and what will remain. The answer should name the surfaces involved. Deck boards, stairs, railings, posts, and undersides shouldn’t be treated as one vague line item. If peeling or loose material appears, ask how that condition changes the preparation plan. Our guide to deck stain peeling causes can help you frame that conversation without diagnosing the deck from a photograph.
Cleaning is another scope item that needs detail. “Wash deck” doesn’t explain the planned method, drying decision, or treatment of stubborn areas. Ask what the painter expects the prepared surface to look like before the sample goes down. If washing is proposed, review the questions in our article about pressure washing a deck before staining.
The product label matters here. Request the proposed product name and current preparation instructions. Confirm that the painter’s plan matches the manufacturer’s directions for the wood and existing finish. If compatibility can’t be confirmed, that uncertainty should appear in the proposal rather than being hidden behind a broad promise.
Don’t approve the whole deck based only on an unprepared patch. A quick swipe over gray boards won’t show the same result as a properly prepared section. The sample should follow the preparation planned for the actual project.
This stage may also change the finish choice. If the wood can’t produce the transparent appearance you want, discuss another visual goal or additional preparation. Don’t assume that changing opacity will solve unresolved surface problems.
Compare transparent and solid-color finish goals
The transparent-versus-solid decision is mainly about what you want to see. Transparent stain keeps the wood’s grain and natural variation involved in the final design. Solid-color deck stain makes the selected color the dominant visual element.
Choose a transparent direction when visible wood character is part of the goal. Expect individual boards to remain visually distinct. Uneven color, old repairs, replacement boards, and dark marks may still influence the overall appearance. Don’t approve this option based on a tiny manufacturer chip. The actual deck must be part of the decision.
Choose a solid-color direction when you want a more unified color across the deck. That doesn’t mean every crack, joint, contour, patch, or damaged area disappears. Solid color changes the appearance, but it shouldn’t be sold as a repair method or a promise to conceal every defect.
The house can help guide the choice. Compare the sample with exterior walls, doors, trim, hardscape, and nearby fencing. Look at the deck from inside the rooms that face it. A color that seems quiet at arm’s length may become a strong block when viewed through a large window.
Keep maintenance expectations out of guesswork. No fixed schedule for your deck can be confirmed from this site’s approved evidence. Ask the product manufacturer and painter what affects the selected system. Keep the final product information with your project records. Our article about how often to stain a deck in San Diego explains how to monitor the finish instead of relying on an invented calendar.
Neither opacity level wins every comparison. The useful question is whether the prepared sample matches your deck and your finish goal.
Test color on a prepared section
A prepared sample is the most useful bridge between a color card and the finished deck. Put it on the actual wood after the agreed preparation, not on loose lumber from somewhere else.
Select a section that represents the deck’s visible condition. If the deck contains noticeably different boards, sample more than one condition. A replacement board and an older board may not create the same visual result. The point isn’t to produce a perfect miniature. It’s to expose differences before the larger commitment.
Compare transparent and solid-color options side by side when both remain possible. Keep each sample clearly labeled with the product name, color, and finish type. Written labels prevent confusion after several similar browns or grays appear together.
Review the samples from normal viewing positions. Step back to the doorway, yard, or seating area. Check the color beside the house and railings. Return at another time before approving it. Don’t depend on a phone photo, since screens and camera settings can shift the appearance.
For transparent stain, decide whether the visible board variation supports the look you want. For solid color, decide whether the larger color field works with the surrounding surfaces. Inspect repaired or replaced boards separately rather than assuming the sample answers every condition.
Get the final selection written into the proposal. “Brown stain” isn’t specific enough. The agreement should identify the manufacturer, product line, color name or code, and selected opacity. It should also state where that system will be applied.
If a test result disappoints you, pause. Adjusting the product, preparation, or color on one sample area is simpler than disputing the appearance across the full deck.
Confirm prep and repair exclusions with the painter
Before signing, compare proposals by scope rather than headline wording. One painter may include detailed surface preparation while another lists only “stain deck.” Those aren’t equivalent descriptions.
Ask each painter to identify included surfaces. Confirm whether the quote covers deck boards, railings, stairs, posts, gates, and board edges. Then ask what’s excluded. Furniture moving, plant protection, inaccessible areas, carpentry, fastener correction, and board replacement should be discussed if they affect your project. Don’t assume an item is included because it seems obvious.
The proposal should also distinguish preparation from repair. Ask which existing defects the painter will address before coating. If damaged boards require another trade or a separate approval, get that boundary in writing. Solid-color stain shouldn’t be presented as a way to skip that conversation.
Request the exact coating system before work starts. Check its current label and manufacturer instructions. Confirm the selected color and opacity against the approved sample. If the existing finish remains unidentified, ask how compatibility was determined and have the answer added to the scope.
Discuss cleanup, access, pets, gates, stored items, and protection of nearby surfaces. These details affect how the job is organized, but don’t accept unsupported promises about timing, coating life, or warranties. Any warranty comes from the independent painter or manufacturer, not Paint Pros San Diego. Review its written terms directly.
Verify the contractor through the CSLB license check before signing. Paint Pros San Diego is a referral service. You’ll contract with and pay the matched independent painter directly.
When to call us
Call when weathered boards, an unknown finish, or mixed repairs make the stain choice unclear. A qualified local painting pro can inspect the deck, define the scope, and prepare test sections for comparison. Call us at (858) 400-6422 and we’ll connect you with a licensed local painter.